


 Bestseller
 All Printers
 All Labels
 Money counting machine
 All Accessories
The size and resolution of the source file play a crucial role in printing a perfect shipping label. In this article, we will discuss the factors that can lead to poor print quality and show ways to fix these issues.
Size
If your printer is set to 4 x 6 inches, but the source file size is 8 x 11 inches, the original file will likely be printed enlarged, which can result in poor print quality. Only when the source file size matches the printer settings can you produce a perfect shipping label.
By default, many services such as Canada Post, USPS, UPS, FedEx, DHL, and Colissimo by La Poste are set to 8 x 11 inches. To address this issue, MUNBYN has developed software called Munbyn Shipping Label Converter Software, which can process these labels. With Munbyn Converter Software, it is possible to print over 50 labels at once without having to take a screenshot for each individual label.

You can download the Munbyn Converter Software from the following link:
munbyn.biz/PDFMP
On some platforms, you also have the option to customize the size of your labels. Instructions on how to adjust the settings can be found at the following link:
E-commerce platform (Online Store) - MUNBYN Help Center

Resolution
Four key factors determine the quality of your label: the clarity of the source file, print density, print head, and label quality.
1) Clarity of the source file
Labels in PDF format are often superior to other formats in terms of legibility.
2) Print density and speed
The density and speed of printers are set by manufacturers as standard. This can explain why labels sometimes appear faded. In such cases, the problem can often be resolved by increasing the print density.
You might wonder why manufacturers don't set the print density to the highest level by default. If this were done, the appearance of the printed label could be distorted, and it might no longer match the source file. The barcode on the label might then be unscannable. If this happens, you will need to reduce the printer's density settings.
Instructions on how to adjust print density and speed can be found at the following link:
How to adjust the density and speed in the settings? - MUNBYN Help Center
3) Print head
The print head is the part of the printer that comes into direct contact with the label paper. The printer heats the print head to transfer the content to the thermal label paper. During the printing process, the heated thermal label paper creates certain carbon substances that can accumulate on the print head. Over time, these deposits cause the print head to become covered and the labels to appear unclearly printed. Then it's time to clean the print head.
Instructions on print head maintenance can be found at the following link:
https://support.munbyn.com/hc/en-us/articles/4468172845331-How-to-maintain-the-print-head-
In addition, print heads have a limited lifespan. A typical print head can print about 60,000 labels, while a MUNBYN printer is capable of printing up to 200,000 labels during its lifetime. Even better, MUNBYN offers a 24-month warranty on its printers.
Buy the Munbyn thermal label printer via the link below:
https://de.munbyn.com/collections/alle-thermodrucker
4) Quality of labels
Some people assume that the cause of poor print results in label printing lies solely with the printer. However, the quality of the labels themselves also plays a major role. After MUNBYN researched and tested most label printers available on the market, the specifications of MUNBYN labels were adjusted to suit most printers.
Buy Munbyn thermal labels via the link below:
https://www.amazon.de/dp/B07W7H7G4P
How to Print Shipping Address Labels from Word – 100 mm x 150 mm Thermal Shipping Labels
Step 1: Select the appropriate paper size (100 mm x 150 mm)
✅Create a new Word document.
Click on "Mailings" > "Labels".
See image below

Select "Options" - "Label Options" > "New Label".
See image below
✅Enter the required dimensions.
🟢"Page Size" - "Custom".
🟢"Page Width" and "Page Height" - for the 4'' x 6'' shipping label, enter 10 cm * 15 cm.
See image below

🟢"Label Height" and "Label Width" - depend on the number of labels per row and column.
For example, if you want to print 10 labels (2 in each row and 5 in each column) on 10 cm * 15 cm paper, then:
Label Height=Page Height/Number of Columns=15/5=3cm
Label Width=Page Width/Number of Rows=10/2=5cm
See image below
🟢"Top Margin" & "Side Margin" - it is recommended to set all margins to 0 cm (you can, of course, change them according to your needs).
🟢"Vertical pitch" - corresponds to the label height, which is 3 cm.
🟢"Horizontal pitch" - corresponds to the label width, which is 5 cm.
🟢Give your template a name in the "Label name" field and click "OK".
See image below

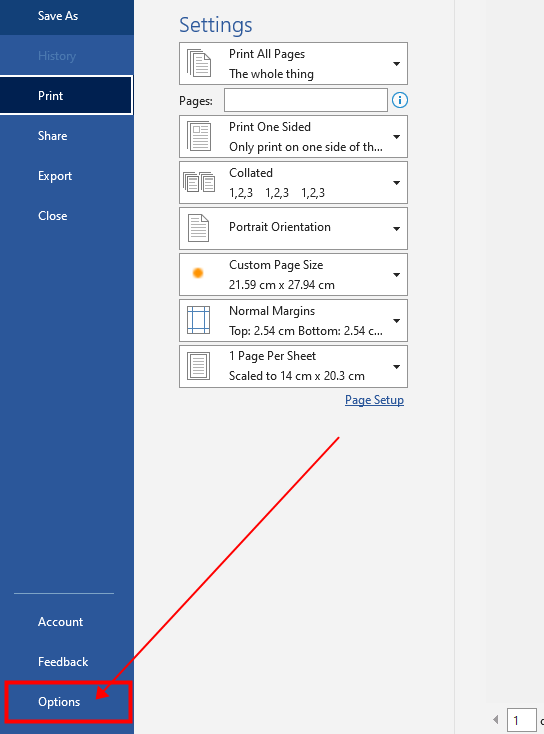
🔔 If the unit of the margins is inches, you can change it as follows:
✅ Select "File" > "Options" > "Advanced".
✅ Scroll down to "Display".
✅ Select the desired unit of measurement from the dropdown list.
✅ Click "OK".
See image below

Step 2: Enter print content
✅ If you want to print all labels with the same content.
🟢In the "Address" field, type the text you want to appear on each label.
🟢 In the "Print" section on the left, select "Full page of same label".
🟢 Click "New Document".
See image below

✅ If you want to print a page of labels with different content.
🟢Do not enter any text in the "Address" field, leave it blank.
🟢 In the "Print" section on the left, instead of "Full page of same label", select "Single label".
🟢 Click "New Document".
🟢 Add the text separately to the individual labels on the blank label page.
See image below

Step 3: Print preview and print
Press Ctrl+P to check the size and print preview.
✅ Click "Print" or press Enter.
See image below


Share:
How to Make Creative Stickers in 4 Easy Steps
How to print shipping labels on Etsy? (A step-by-step guide)